Saving Images for Web- Photoshop
It's time for PART 2 of how to save your images to web!
If you're starting in Lightroom, visit my last tutorial here!

In my first post about saving images for web, I talked about the importance of prepping your images for looking the best online for your clients & Google rankings. All of the same information applies here, we're just getting snazzy in Photoshop instead of Lightroom!
There are several image optimizing ways to prep your photos to be seen online and over the next couple days I'm going to show you Photoshop and then Bridge on the following topics. (Lightroom we've already covered)
How to save in the best web quality from Photoshop.
How to quickly check if your color, filetype and filename are prepped for web.
How to add keywords quickly to help build SEO online using Bridge
PhotoShop
Saving your Images in Photoshop CC
I'm using Photoshop CC, but Photoshop CS3-CC this will relatively be the same process. (message me if you have questions!)
Open your photo into Photoshop
Edit your photo
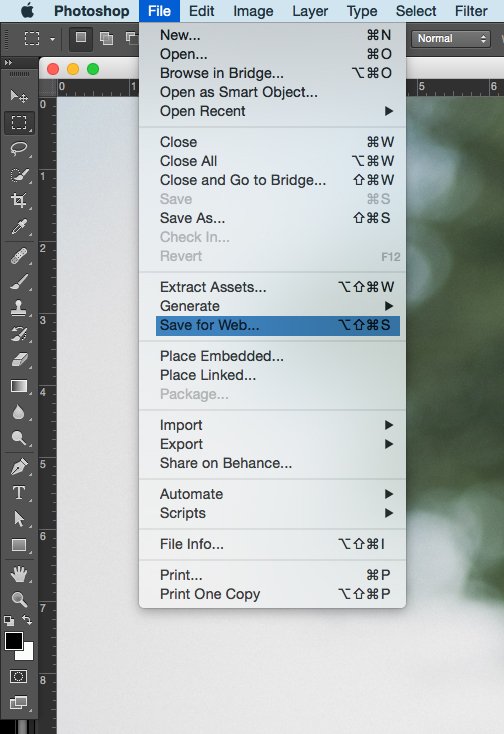
Go to FILE-SAVE FOR WEB (CMD+ALT+SHIFT+S) that's my favorite shortcut for some reason
**Note** Even if you have layers this will compress for web. Also, note you should save a separate file if you've made changes and want to save it at a higher resolution. This process will ONLY save for web, it's not saving like you normally would.
4. After going to FILE - SAVE FOR WEB the SAVE FOR WEB dialog window will pop up and for basic jpeg compression you can make your window match this.
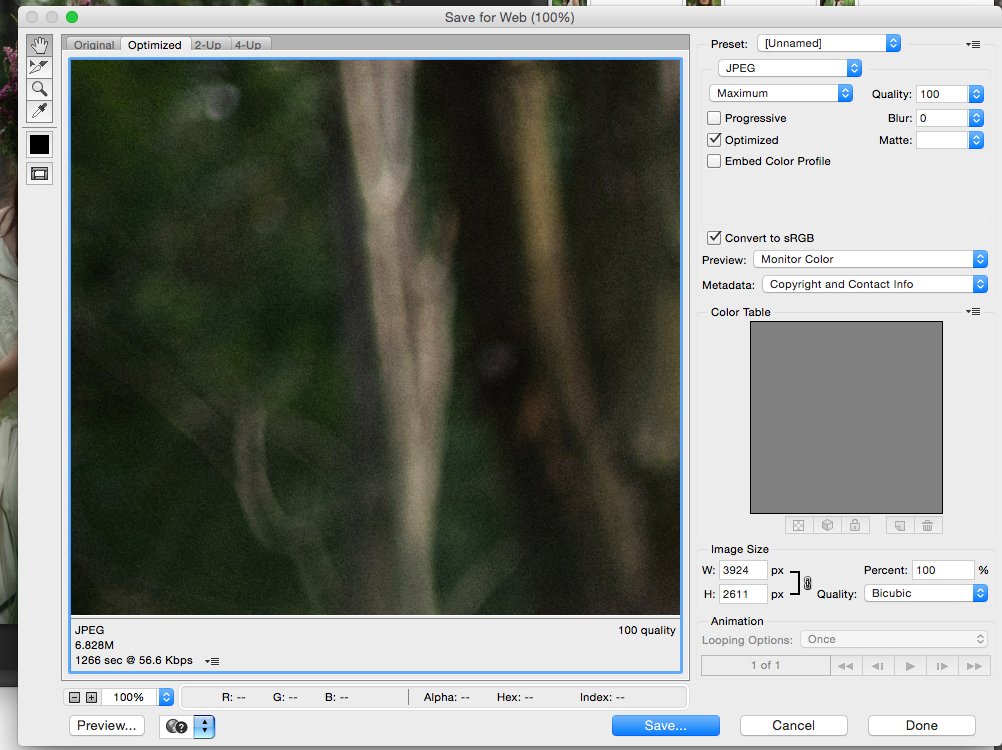
5. The main thing I will change is the Image Size, where it says W:3924 & H: 2611px. If you have a blog where you like to keep your images consistent across each image, you can change the width to that number. (below I made it 2000px) hit enter and it'll change the image. You can preview before it saves.
**NOTE: change the view tab to 2-up and you can see the before and after quality difference (I can rarely even tell!)
I will be discussing presets you can create to make this process faster soon!

6. Your Metadata is SOOOOOO important. Did I mention, it's important? Any keywords you've already put into your images in Lightroom are still intact when you saved them out - IF you saved them how I discussed in the Lightroom Tutorial. If not, don't worry we'll talk about a final way to get your metadata added to your images quick & simple!
**Make sure to change that check mark on that drop down menu to ALL or All Except Camera Info. Some people want to keep their camera setting top secret!!

If you think you've gotten a hang of everything you need to know in the window dialog box and you've got more important things to do - then get ready to be a time saver! I used to pass by so many options in my creative programs to SAVE TIME and now I consider them a lifesaver!
No matter how easy the task - make a preset.
8. Click on that down arrow and hit Save Settings. Name your preset and be ready to use it again when you're saving in Photoshop, along with some other batch tricks I'll show you when we get to Bridge!

Thanks for following along and if you have any questions fell free to message me. I'll be releasing the next HUGE photo enhancing step when it comes to having your images on the web later this week, so sign up if you can't wait!
-Tara

TARA SHUPE
Tara Shupe is a Humanitarian Photographer and Video Storyteller, constantly traveling with a camera attached to the hip and a notebook in her pocket. With over 10 years of experience in the field, Tara approaches each story intimately with a hope for inspiring others to think beyond their comfort zone.


